Ok, this post is about catching up on an old project!
A semester ago, I took MIT’s Robotics: Science and Systems (6.141). I feel obligated to mention that, sadly, the instructor of this course Prof. Seth Teller has since passed away. On this topic, the MIT news office has a well-written article on Prof. Teller and his work. However, the focus of this post is going to be on the structure of the course and the final project.
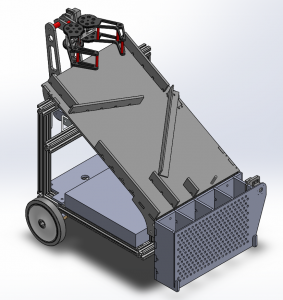
My team used a few techniques to build this robot quickly and flexibly for our final project for 6.141.
It turns out there are several introduction to robotics classes at MIT. 6.141 is offered by Course 6, the Electrical Engineering and Computer Science department. However, there’s also Introduction to Robotics (2.12), offered by Course 2, the Mechanical Engineering department. Last semester, I took 2.12, and it’s safe to say that both 6.141 and 2.12 offer a hands-on introduction to robotics, but from different perspectives. 6.141 has a focus on algorithms related to robotics, such as those for navigation, motion planning, and machine vision. By contrast, 2.12 has a focus on analyzing mechanisms, like multijointed robotic arms or legs. The two classes had some overlap in their discussion of techniques for sensor fusion and filtering. 6.141 also offers an introduction to the Robot Operating System (ROS) and has a technical speaking and writing component. As someone who is interested in improving my public speaking skills, I thought the speaking component was fun. For students interested in robotics, I recommend taking both.
That said, Course 6 also offers an EECS survey class, 6.01. Though I hear 6.01 has changed since I took it, I found it was also a great class in terms of introducing students to problems and algorithms in robotics, perhaps as good as 6.141. For example, 6.01 included a series of labs in which students wrote code snippets for filtering, state estimation, and path finding, which ultimately allowed robotic vehicles to race through a maze. Like 6.141, the labs in 6.01 seem to build up to the notion of SLAM, starting with labs on simple navigation techniques and gradually becoming more advanced. However, unlike 2.12 and 6.141, 6.01 lacks a final project component.
The final project components was also how 2.12 and 6.141 differed. Ironically, although 6.141 was a computer science class, and 2.12 was a mechanical engineering class, I found I did mostly mechanical work for my 6.141 team and mostly software for my 2.12 team. I suppose this is because 6.141 attracted mostly computer science students, and 2.12 attracted mostly mechanical engineering students. For this reason, though, I’ll discuss the mechanical design of our 6.141 robot here.
The final challenge for 6.141 was to build, in a team of five, a robot to explore a room-sized arena, find colored blocks, and build a structure with them. We decided a neat way to further define the problem would be to build several towers of blocks, with each tower formed by only one color of block. We were also pressed for time, so I took a few steps to build this machine as fast as possible.
With this in mind, I decided the best way to design the hardware of the robot would be to break it up into physical modules. Each module could be designed independently, allowing people to design them in parallel, or at least reducing the cognitive load if one person worked on all modules. After consulting with the team, I settled on four: a chassis module, an arm/manipulator module, a block sorting module, and a storage module. The chassis would be the base of the robot and would include the frame, wheels, motors, battery, and laptop computer. The manipulator and arm would be mounted on the front of the chassis, able to pick up blocks from in front of the robot and drop them off on top of the robot. Atop the chassis would be mounted the block sorting module, which would sort and deliver blocks to the storage module, mounted to the back of the chassis. Finally, the storage module would feature a door or gate to release the blocks, stacked in tower formations.
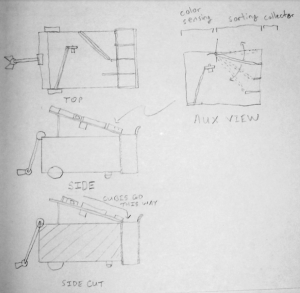
This initial sketch of the robot included a fifth module: a color detection module attached to the front of the sorting module. However, we later decided to mount the color sensor on the claw itself, eliminating the need for color sensing while chanelling blocks.
Another convenience about the modular design of our robot was that it was really easy to take modules on and off. For example, to get at the electronics of our robot, mounted on the chassis, we could simply unscrew two screws and lift off the sorting mechanism.
So that I could design each module separately, I first settled on the interfaces between the modules: each module would be able to attach to a separate horizontal bar of 80/20 aluminum extrusion attached to the chassis. I knew that I would want to adjust the exact heights and other dimensions of each module after I built the first prototype, so I deliberately designed these 80/20 bars to be adjustable in a few dimensions, such as height. Also, using the same technique as I detailed in my post about a window fan, I created a dimentions.txt file in which I recorded these dimensions. I used these as global parameters, which I referenced while designing each module, knowing their specifications for the connection points were the interfaces between each module.
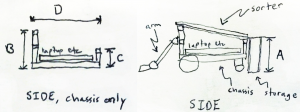
At the start of creating CAD for the robot, I created a quick drawing to specify the meaning of dimensions A, B, C, and D in this drawing. I gave them names and specified them in dimensions.txt.
Also to cut down on construction time, I designed each module mostly out of 80/20 and laser cut acryllic. Using the laser cutter made it easy and fast to cut improved versions of parts. I also used Jesus Nuts for fast assembly.
The first two modules were straightforward. The chassis I designed was a slight adjustment from the squarebot chassis we had been using in labs earlier in the semester. Similarly, the arm and manipulator were re-used from earlier labs, but we added a color-detecting sensor to the manipulator to detect the color of the block being grasped.
For the sorting module, we came up with a few options but settled on one that minimized the number of moving parts. The module consisted of a slanted panel with guides for blocks. First, the manipulator drops blocks off at the top. Then, one guide funnels all the blocks to one side of the robot. An actuated flipper then guides a block to one of four channels depending on the color of the block determined earlier from the color sensor.
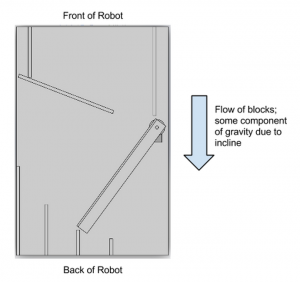
This view, normal to the surface of the sorting mechanism, shows how blocks are first funneled to the flipper then channeled to a chute. Gravity pulls them down the mechanism.
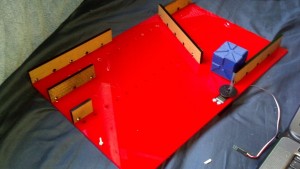
The first version of the sorter mechanism was fast to assemble and convenient for testing things like the minimum slope required for cubes to slip.
Finally, the collector module consists of four containers just big enough for cubes to stack one atop another. I created a few prototype single-column containers to determine the amount of extra room necessary to keep blocks from sticking to the wall. The containers were open on the top to allow blocks to slide in from the sorting module. I designed one side of the module to open, allowing the robot to drive away, leaving four towers of stacked blocks.
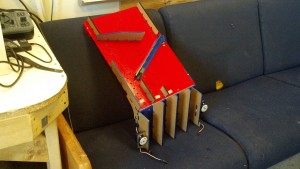
The final storage mechanism included four columns and a double door at the back. Here, the doors are removed to see inside the chutes. The final sorter module is also attached atop.
As mentioned earlier, these techniques allowed me to quickly make improvements to parts. For example, I increased the heights of certain walls that blocks were able to fall over, I increased the slope of the sorter to reduce the chance of blocks sticking, and I replaced the single door on the back of the storage mechanism with a double door mechanism because the weight of a single door was pushing the limit of what the servo could provide.
Unfortunately, I wasn’t able to collect much video footage before the disassembly of our robots, but the following two videos show our robot during testing and in action.