Archives

All posts by Steven Keyes

If it ain’t broke, don’t fix it. As I wrote in a previous write-up, a clock turned out to be a great gift idea for a very special person, so I decided to make another for the same person a couple years later. To contrast the wooden, analog clock I made before, I decided to make one covered in LEDs. Same as before, my vision was to create a 12-point mandala. Although this clock has no hands, the 12 points still allow it to display time in a way that is reminiscent of an analog clock, as described in the Patterns section below.

In this post, I’ll walk through my design process from initial sketch through hardware development and programming. At the end, I have provided links to the design files and source code. I also used this project as an opportunity to learn KiCad and to learn and practice the philosophy of what makes a readable schematic, so I’ll mention that as I go on. As a disclaimer, I made this back in 2019, so some libraries etc might be out of date.

Initial Sketch

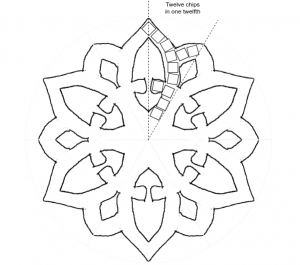
My first step was to sketch out what I wanted the clock to look like and what I wanted the system to look like. As I mentioned, I wanted to make a 12-point figure, so I used this website to sketch some rotationally symmetric shapes. I wanted at least a little more detail than a 12-point star, but I knew too much detail would not be possible to cover with LEDs, so I settled something with 6 big petals, 6 small petals, and a broken ring around the middle as shown below.

Part of my vision was to have all the LEDs on one side of the piece with no other electronics visible, for a clean look, so I next looked into how many LEDs I could cram onto the outline I made. I exported my outline into draw.io, and, using some squares set to common sizes of RGB LED modules, and assuming a ~6 inch wide piece, I took a guess at how many I could fit in the space, as shown in the image above. Although I guessed each twelfth of the shape could fit 12 LEDs, it turned out to be a squeeze once I started routing, so I later reduced it to 11.

As shown below, I next sketched a block diagram of what the electrical system would need: a single chain of LEDs snaking around the board, a microcontroller to send the patterns, some buttons, and a battery-powered RTC to avoid losing the time when the device was unplugged. For the microcontroller, I decided to use an ATMEGA328P-AU, the same as on an Arduino Nano, specifically so that I could flash it with the Arduino bootloader. I wanted the piece to be user-friendly including if the user wanted to add patterns or fix anything, and I figured this would be the most convenient way to allow this.
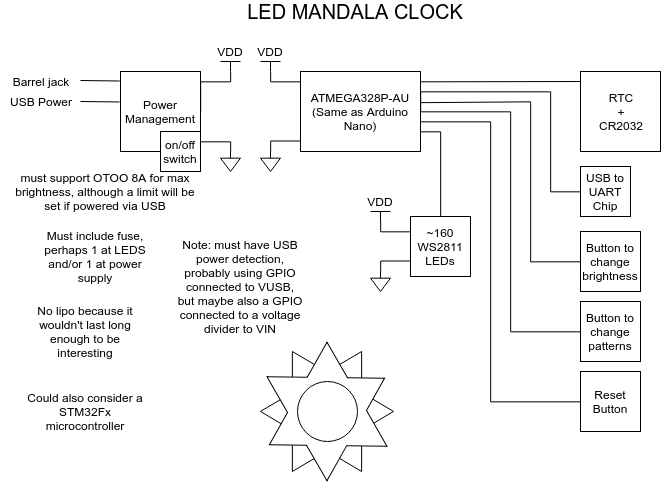
Initial draft of the electrical system for the clock, although I changed a couple things by the time I finished the schematics.

Based on some experimenting with an LED strip, I found this many LEDs to be super bright. As a result, I decided to power them with a fairly low voltage of 3.3V. This is actually below the minimum specified in the datasheet for the WS2813 (the LED I ended up using), but I found a large majority of the chips still worked at 3.3V, which was good enough for a one-off project. Lowering their maximum brightness also had the benefit of decreasing the step size of the brightness levels, making the patterns smoother. In addition, this allowed me to use the same 3.3V supply for the LEDs and all the logic chips on the board.

Schematics

With the big picture in mind, I started on the electronics. For the components themselves, some notable choices I settled on were:

  • WS2813 for the LEDs themselves — similar to WS2811 and WS2812 that I’ve used before, and they include a redundant data line so that, if one chip fails, the next chip in the chain still works.
  • DS3231M for the RTC — its crystal is internal to the IC itself along with a temperature sensor, which allows it to compensate for temperature drift, making it much more accurate than a regular RTC.
  • MPM3620A, an integrated buck converter module, for the 3.3V power supply on the board — I find modules like this to be super convenient for prototypes.

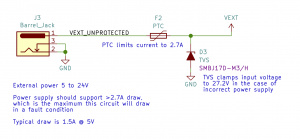
I also used an input-protection paradigm that I kind of like: a fuse followed by a transient-voltage-suppression (TVS) diode, as shown in the following snippet. The fuse (F2) protects the external power supply in case the LED clock has a short; it is sized to be big enough that it won’t blow in normal operation, but it will blow before the external power supply is damaged. On the other hand, the TVS diode (D3) protects the LED clock from the external power supply in the case of excess voltage being provided.

Modified snippet from the schematics

TVS diodes work by becoming much more conductive above a certain voltage, making it very hard for the external supply to raise the voltage past that threshold. A TVS diode is typically used for transient spikes in the external supply, but, as long as the TVS diode is rated for more current than the fuse, it will even protect against the user connecting a supply whose voltage is too high in this scheme.

In my case, I used a positive temperature coefficient (PTC) resistor as the fuse. When PTCs heat up from high current, their resistance shoots up, acting like an open circuit, but they conduct again when they cool down. As a result, they act like an automatically-resetting fuse, which is more user-friendly than a regular fuse.

I think I’ve seen this scheme in automotive designs, and I also saw it is used on the Ruggeduino (see Method #1 discussion on this page).

Anyway, you can read through my full schematics attached at the end of this post. In the course of bringing up the board, I noticed a couple errors in the design, so I actually updated the schematics to point them out. I was able to work around all of them for this iteration, but you would want to fix them before reusing the relevant parts of this design.

Schematic Philosophy

In the course of making the schematics, I spent a good deal of time thinking about what makes a good / readable / useful schematic — here is one article I liked on the subject. Let me know your opinions on what makes a good schematic. Making schematics is an art and requires inspiration.

My schematics are done in the hierarchical style (i.e. starting with a top-level page), and some practices I mostly followed were:

  • Each page reads left-to-right: inputs on the left, outputs on the right.
  • Each major integrated circuit gets its own page.
  • Comments are succinct but answer the questions people would have when looking at the schematics.

One thing I didn’t like about KiCad (at least the version I used) was how it handled re-using schematic sheets (i.e. what Altium calls “multi-channel design”). In my case, I didn’t want to draw out all 132 LEDs, so I drew one twelfth of them on a sheet. Then, I created 12 duplicates of that sheet in a higher-level sheet. KiCad was able to do this just find, the only downside is that the exported PDF includes 12 pages that are almost exactly the same except for incremented part designators. I feel like there ought to be a more user-friendly way to tell the reader that the circuit is repeated 12 times without actually printing 12 near-duplicate pages. For example, there could be a single page with placeholders for the designators along with a table of the 12 different designators used in each copy of the circuit.

Layout

As for the layout, I took my sketch from before, re-drew cleanly it in a Solidworks sketch, and exported the DXF to import in KiCad. I routed the whole thing on 2 layers, which made the board quick to manufacture and less expensive than a 4-layer board. This worked fine except for the USB lines, which ended up only working intermittently, I presume because I didn’t know much about controlled impedance or return paths at this point. In the end, I tried a bunch of USB cables and eventually found one that worked reliably.

Routing is always my favorite part of PCBA design, and this project was especially was fun given the 60 degree angles instead of the usual 90 and 45 degree angles. I rotated several components to 60 degrees to fit on the arms, and I did a lot of free-angle routing in the narrow regions of the arms. Unfortunately, KiCad also didn’t have good support for re-using routing (again, “multi-channel design”), so I ended up routing one arm’s worth of LEDs, then writing a Python script to copy the routing to the rest of the arms. Tediously, my script had to modify the text of the layout file directly because the version of KiCad I was using didn’t support scripting within the program itself, but maybe you can do this kind of thing from within KiCad now.
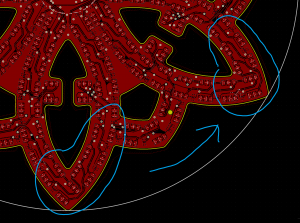
I did the routing once for the LEDs and then copied it 5 times, rotated 60 degrees each time, as shown above. Afterwards, I made minor changes (e.g. to the via placement) based on what components were on the back side of the board.

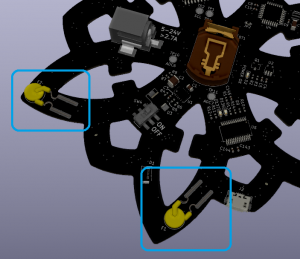
When I was picking components, I was careful to pick only surface-mount components because I knew one side of the board would be covered in LEDs, leaving no room for leads. However, for the PTC fuses, I could only find through-hole parts of appropriate amperage. As a result, you’ll notice I got creative with a new surface-mount footprint for these parts.

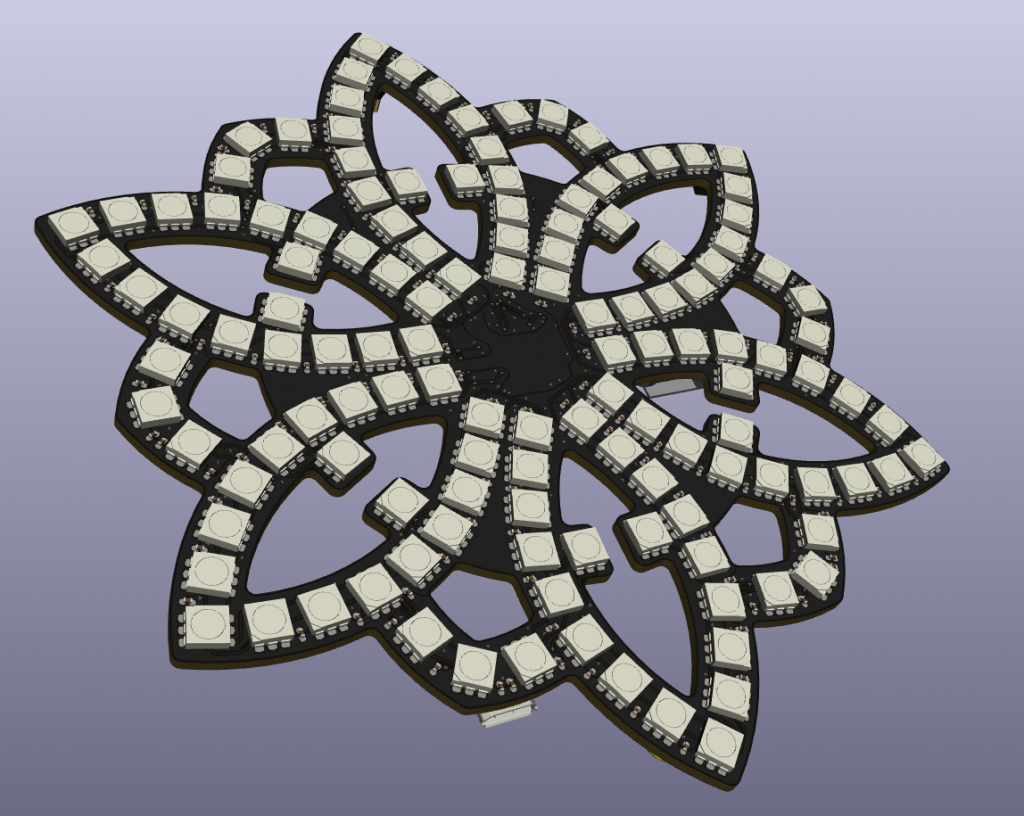
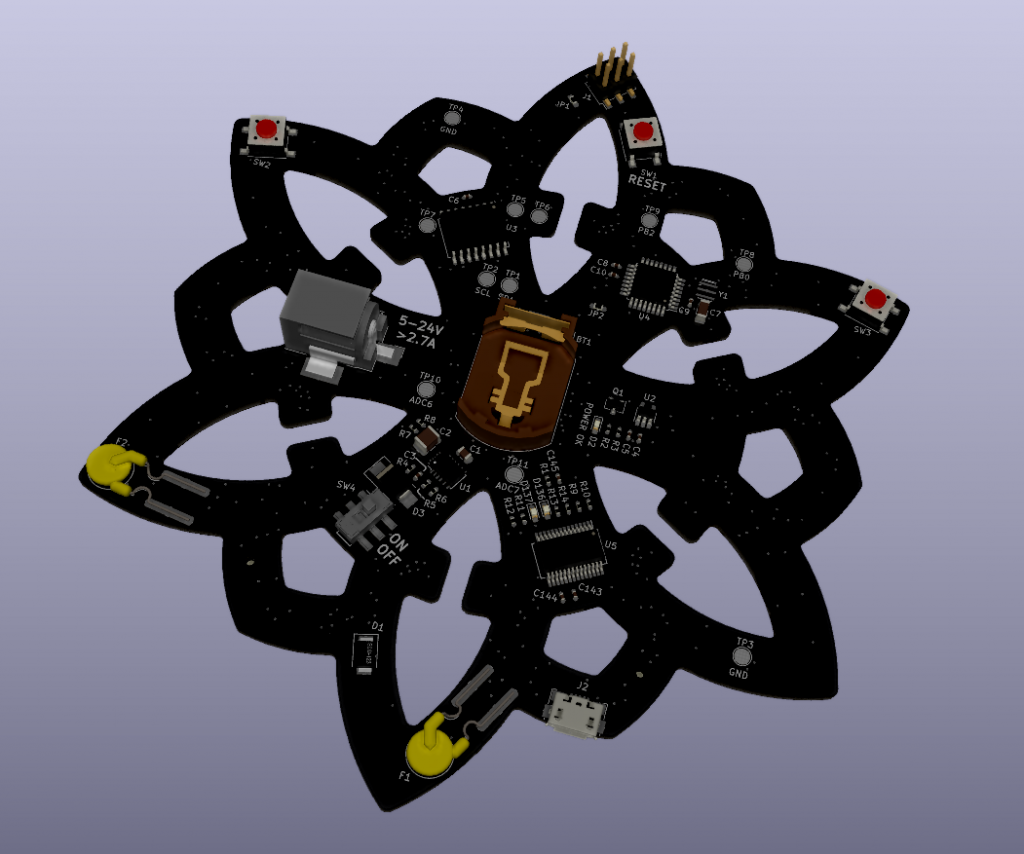
Anyway, KiCad, like other EE CAD software, provides some neat 3D renders of your PCBA, so here’s a look at the finished design:

Manufacture and Assembly

After I laid out the circuit, I had the PCB manufactured by PCBWay, and I installed the components myself. As noted in the schematic errata, I ran into a couple issues as I assembled and tested each portion of the circuit, but I was able to work around all the issues. For the microcontroller in particular, I had trouble flashing the Arduino bootloader and ended up just desoldering the chip from an actual Arduino and using that.

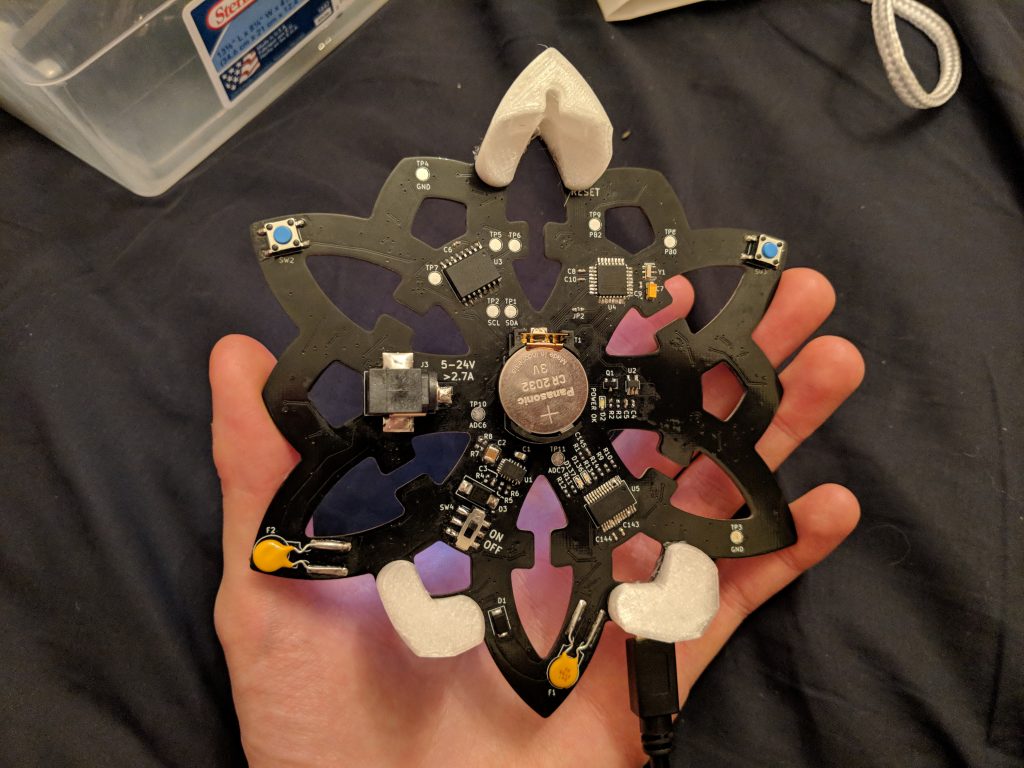
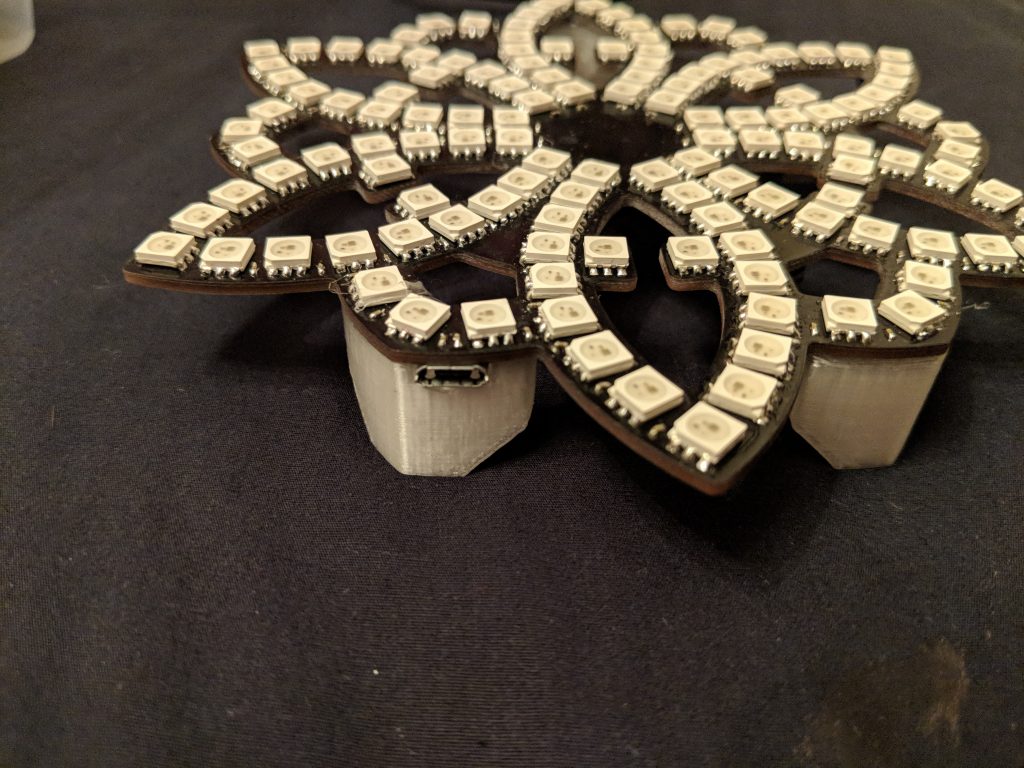
After I installed everything, I also whipped up some 3D-printed standoffs for the board, pictured below.

Software

As far as the software is concerned, this board is an Arduino connected to an LED strip, as mentioned earlier. As a result, the source code is an Arduino project, and it consists of one file for the main loop, one file for the LED patterns, and a couple auxiliary files. Some libraries I used include SoftPWM (for animating the power LED), RTCLib (for the RTC), and Bounce2 (for debouncing the buttons).

For the LED patterns themselves, I wanted to make it easy to highlight the layers of the geometry: the big petals, the little petals, the ring, the outline, etc. I accomplished this by listing the LEDs that made up each of these groups. For example, the middle ring consists of 24 of the LEDs in the entire chain: the 3rd, the 4th, the 17th, the 18th, etc. Then, when I wrote patterns, I could iterate over all the LEDs in one group and apply one color, and iterate over a different group with a different color.

All the patterns are implemented as functions that generate a frame based on the current time. For example, if I wanted a pattern that switches the LEDs on and off each second, I would write a function that checks if the current time is an even second (in which case it turns the LEDs on), or an odd second (in which case it turns the LEDs off) rather than writing a function that calls delay(1 second) repeatedly.

One challenge of generating these frames is that the RTC only provides the current time to the nearest second, which would make for very slow and stuttery patterns. To get around this, I implemented a function that estimates current time to the nearest millisecond. It does this by checking how much time has elapsed on the microcontroller’s internal clock since the last change in the seconds’ value of the RTC time. Long-term, the microcontroller’s internal clock accumulates much more drift than the RTC, but it works great for getting sub-second resolution like this. This is in the file now_ms.ino.

Each pattern function also is passed the current brightness level (0-10) as a guide for how bright to make the frame. In the main loop, one button adjusts this brightness level, and the other button changes what pattern is displayed.

Patterns

If you’ve read this far, you’re probably interested in what the patterns are, and how to read the time off of any of them! Here’s a table. Some of the patterns convey the time while some are just aesthetic. I felt like, since anyone can just check their phone for the time, it was more important that each pattern be beautiful or interesting than be a strictly useful timepiece.

PatternDescription
Analog ClockShows the time like an analog clock: the innermost ring of LEDs is the point of the hour hand, the middle ring is the point of the minute hand, and the outer ring is the point of the second hand.
Rainbow CycleA rainbow cycle moving one direction over all the LEDs paired with a white pulse moving the opposite direction over the big petals
LavaRed and white pulses that move over the entire chain of LEDs
Rainbow Fade + HeartbeatThe entire piece fades through the rainbow every 24 hours while the middle ring pulses white every 3 seconds.
SparkleRandom white flashes over the entire chain of LEDs

The following video shows each of these patterns.

Files

Here are the schematics, CAD files, and software for reference. Enjoy!

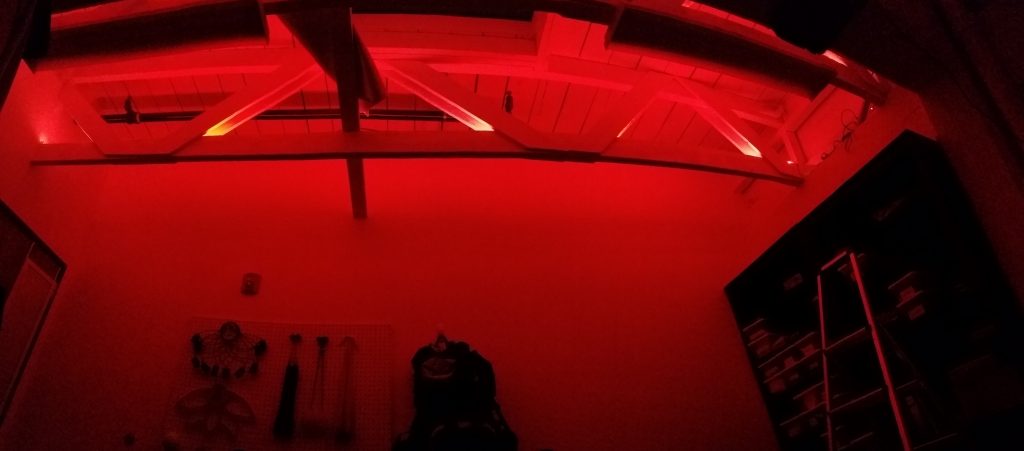
In case you haven’t had enough of rooms lit up with LED strips, here’s another! This is an old project, but I thought it might be helpful to anyone who wanted to do something similar: LED lights controlled wirelessly via nrf24l01 radio modules.

Excuse the breaks in the panorama; humans are still working on panorama technology.

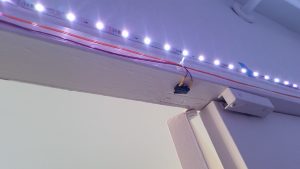
The effect is similar to the room lights I put up in my apartment in Boston (link to post). However, the first place I lived when I moved to San Francisco a couple years ago had some cool rafters in the ceiling, and I wanted to illuminate each of them in sync but without hanging too many wires. So, instead of using a Raspberry Pi to control the strips, I made several strips, each controlled by an Arduino with a radio module. I sent commands to all strips at once using a separate module acting as a remote control.

My favorite pattern was this red, pulsing pattern.

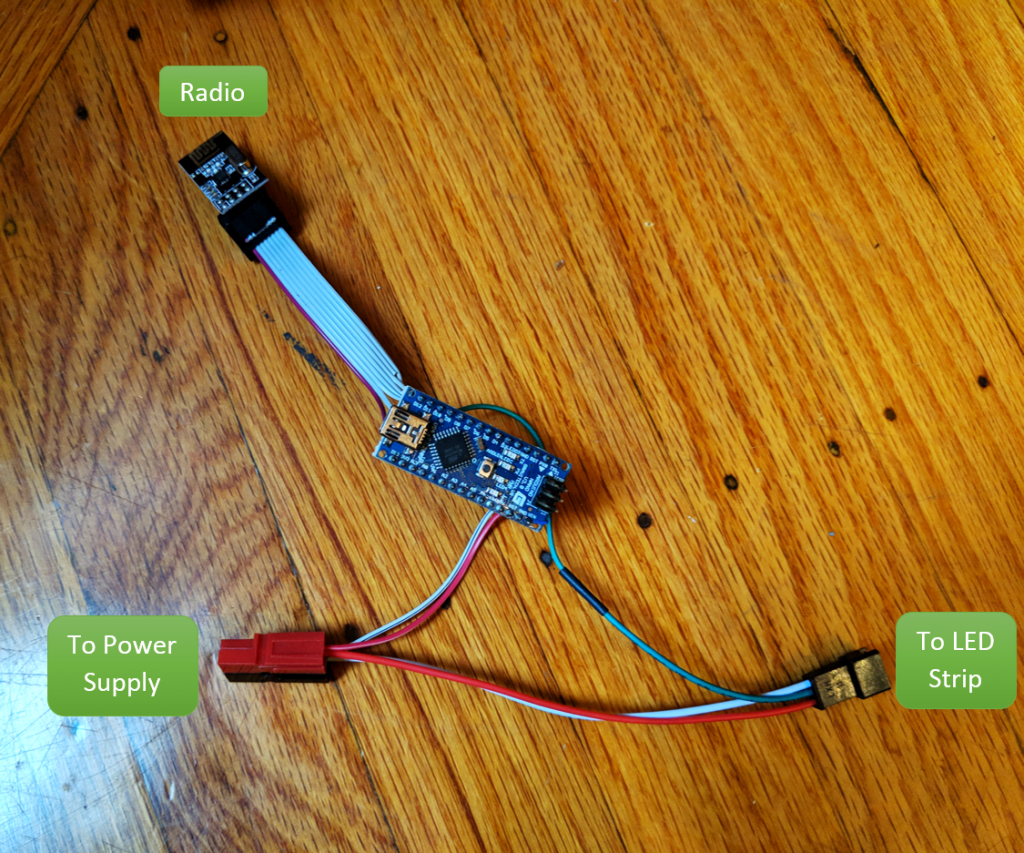
As I mentioned, I used nrf24l01 radio modules, which I find to be really convenient for adding wireless capabilities to a project. The controller for each strip ended up looking like this:

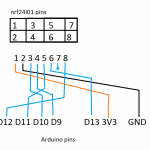
As before, I used 12V, triplet-addressable, WS2811-based LED strips since they’re really cheap yet still allow you to make patterns with spatial motion. A 12V supply powers both the strip and the Arduino (which regulates it down to power the radio). For anyone who would like to replicate this, here’s the wiring that I used between the Arduino and the nrf24l01 module.

As for the software, the source code is on Github here. I used the Adafruit Neopixel library and a nRF24L01 library that can be found here.
In the source code, two Arduino sketches are provided. One sketch is for the light strip controller, and one is for the remote control. The light strip controller advances through a cycle of a few simple patterns whenever it receives a message over radio. The remote control sends a single message when it starts up, so pressing the reset button is sufficient to change the pattern. I powered the remote control Arduino with a USB battery bank so it was portable. I didn’t take a lot of time to make sure the setup works just right, so I’m providing this code more as a reference than as something that will work off-the-shelf.

With that, I’ll leave you with some media for how it turned out.

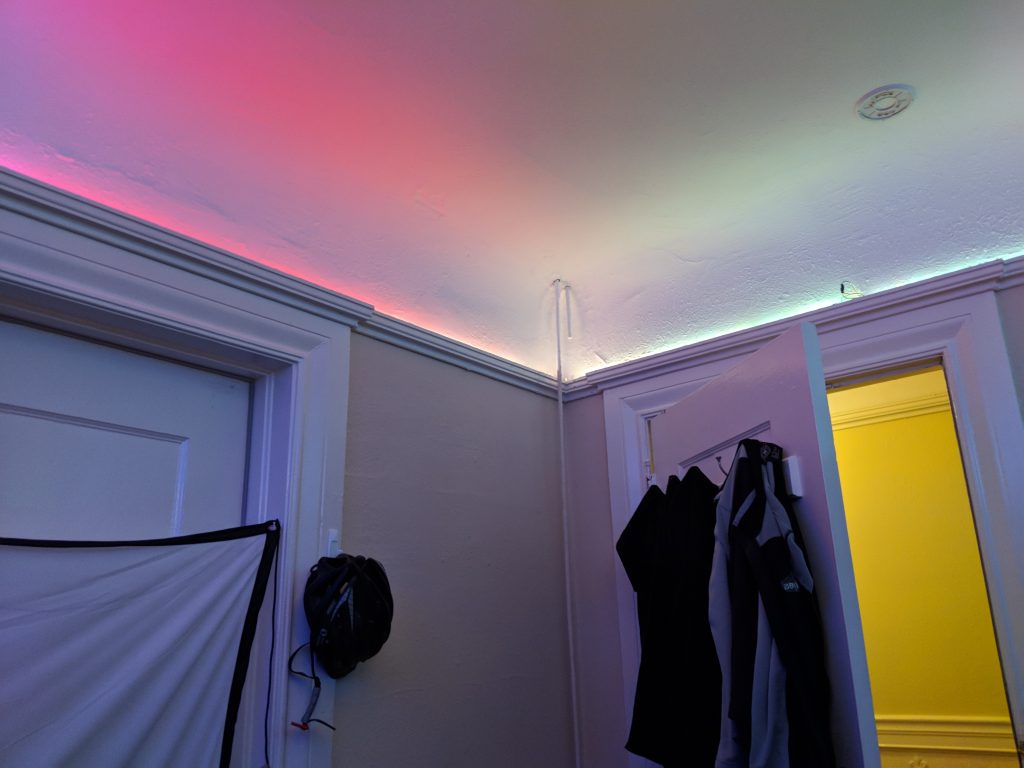
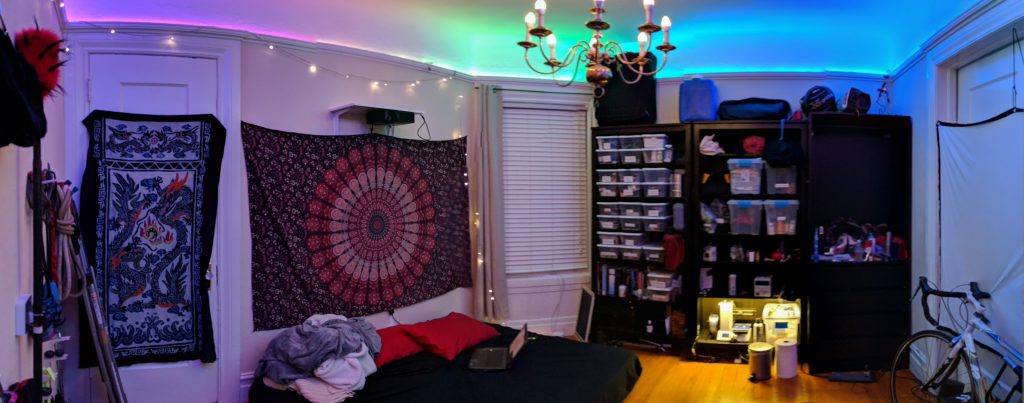
The molding and curved ceilings of San Francisco Victorians turns out to be great for LED diffusion.
I love how the spindly arms of this old-fashioned chandelier complement the vibe of the LED lighting.

I’ve slowly been acquiring blacklight-reactive props, with the latest being a slinky I bought from Slinky Josh at Ignight. Disappointed that everywhere in the world isn’t flooded with blacklight, I decided to take matters into my own hands–er, wrists. I present my blacklight LED wristbands:

(I’m just an amateur slinky and contact ball, but I hope you like the effect)

Overview

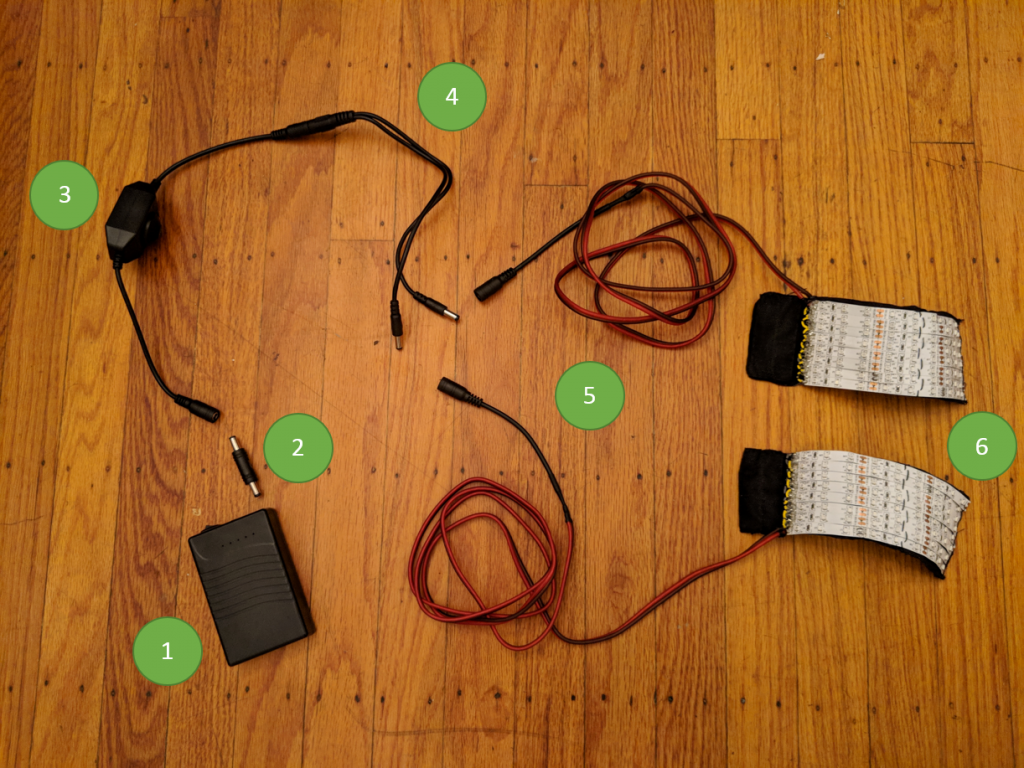
Here’s a diagram of the parts in this build.

This setup includes (1) 12V battery pack, (2) male-male coupler, (3) 12V dimmer, (4) splitter, (5) wires long enough to go down my arms, and (6) wrist bands

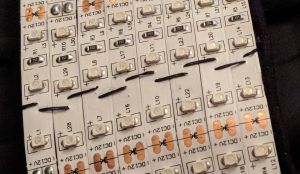
The LED strips are 12V blacklight LED strips, with 8 strips on each wristband. Each strip itself is composed of segments, where each segment has 3 LEDs and a resistor in series. I found 3 segments was a good circumference to wrap around my wrists, so in total each wristband had 72 LEDs. Before buying the battery, I hooked up my LED strips to a voltage source and found that the draw for that many LEDs would be about 850mA.

For the battery, I found a USB battery pack that had a 12V output. I liked the option of using a USB battery pack rather than using a hobby lipo because I feel like USB battery packs look less sketchy to security if I want to take these into a club or something.

Materials

If you want to build your own, here are the materials I used.

  • blacklight led strip (link)
  • 12V dimmer (link)
  • battery (link)
  • splitter (mine came with the battery)
  • power connectors (link)
  • male-male coupler (link) (or you can make your own from the connectors)
  • speaker cable
  • hookup wire
  • rectangle of fabric
  • sew-on velcro (picked some up from Mendel’s)
  • thread, solder, hot glue

Assembly

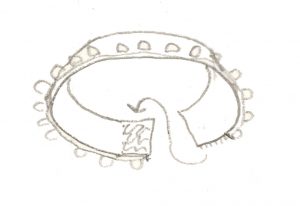
This sketch shows the LEDs on one side and matching pieces of velcro on either end. The fabric extends beyond the LED strip on one end, which is the end where I put the scratchy velcro.

First, I cut out rectangles of fabric wide for the number of LED strips I wanted and long enough to wrap around my wrist with a little extra for the velcro. Then, I hemmed the edge and then sewed on the velcro. This step took a while because I hand-sewed it, but it would be fast to machine sew.

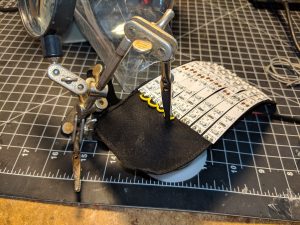
Next, I stuck the LED strips to the fabric, loosely affixed with the adhesive on the back of the strips. I noticed that the LED strips had sections with copper on the sides but no copper running through the middle, so I took advantage of this and sewed straight through the LED strip.

Is sewing through LED strips sketchy?

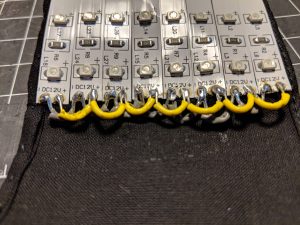
Next, I soldered together all the strips using short pieces of wire to connect all the ground pads and all the 12V pads. Besides the hand sewing, this step took the second longest, partially because it was hard to pin everything down. If I were making a lot of these, it might be worth it to make a tiny PCB with connected ground and 12V pads that just acts as a backing to solder the strips to.

I used the helping hands to hold the wire and also pin down the wristband as I was soldering.

The strips are soldered together in parallel here, with all the 12V pads together and all the ground pads together.

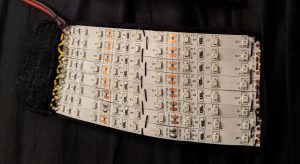
Anyway, after soldering everything, I used some thread to secure the wires to the fabric, and then I coated all the connections in  hot glue, to cover the exposed copper and for strain relief. I also  soldered on the long wires and female power connectors.

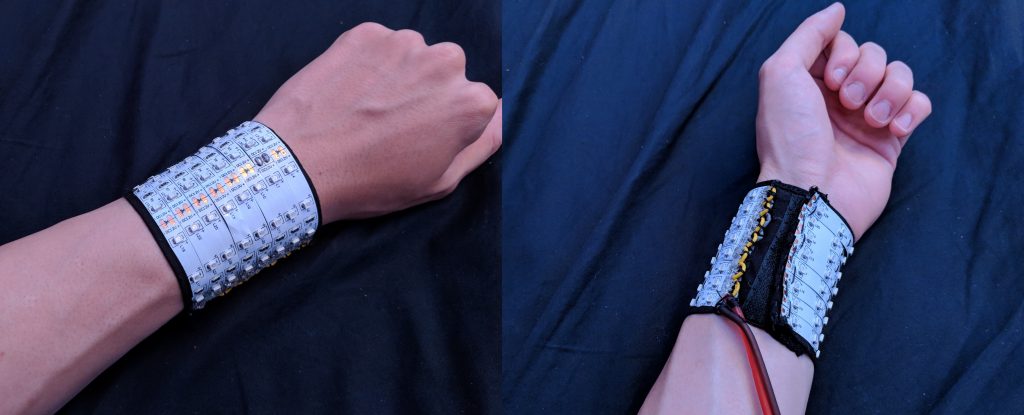
Final assembled wristband

Here’s the front and back of the final product.

Added bonus: the lens flare makes my hands shoot lasers.


Sweet new staff covers

Unsatisfied with the availability of red+black fuzzy staff covers on the market, I recently constructed some staff covers for my new contact fire staff from Dark Monk. This was my first sewing project, and I couldn’t have done it without my friend Casie. Thanks Casie!

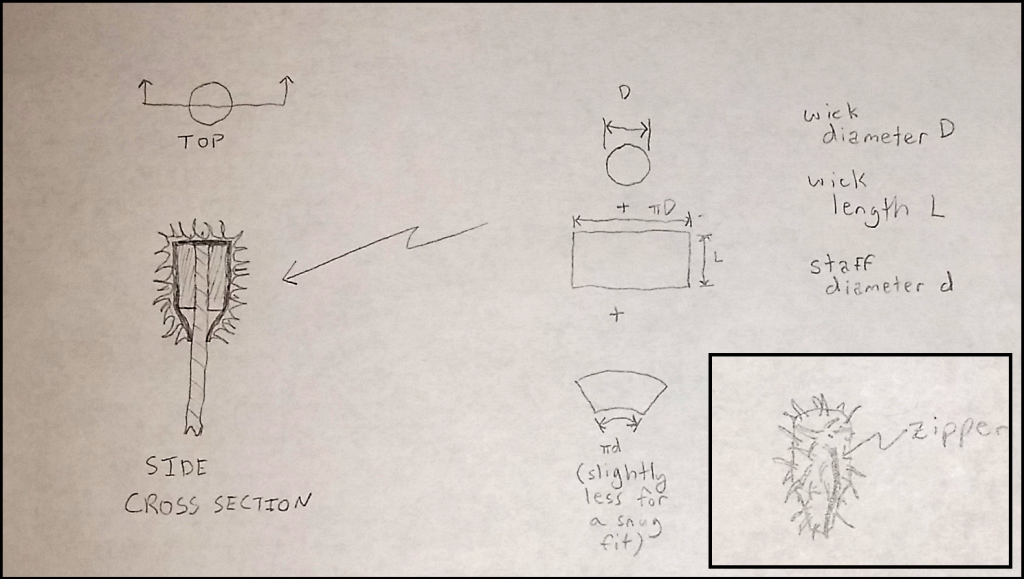
As shown below, my idea was to make a fuzzy staff cover in a bottle shape my attaching three pieces of fabric together along with a zipper.

Here’s a quick sketch of how I imagined constructing the staff covers, out of the three pieces shown in the middle. The spikes on the staff head are supposed to be fur, not fire lol.

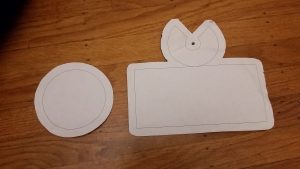
Based on this idea, I constructed the following pattern, which consists of a circle shape and a shape like a rectangle connected to a letter C. I used a SolidWorks drawing in order to get the geometry of the cone correct. After I printed out the pattern, I added a half inch of seam allowance (extra material for the seam) by hand, but I realize I could have added this to my Solidworks drawing as well.

I printed and cut out the above pattern to use to cut my material.

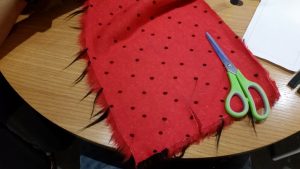
After creating this pattern, I used it to cut my material, which was a piece of red and black fuzzy fabric. I also cut a piece of flat black fabric in the same shapes to be used as an inside lining. Then, I basted (fastened loosely with thread) these two fabrics together to create a single circle-shape and a single rectangle-plus-C shape of double-layered fabric.

When I was cutting the material, I accidentally cut it with the fur laying in the wrong direction once and had to re-do it for one of my covers.

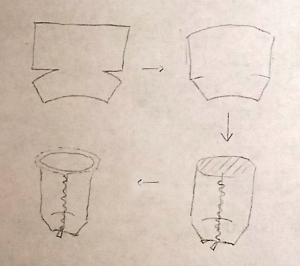
Next I followed the sewing process shown in the following picture:

1. sew the edges of the C shape to the rectangle
2. with the lining facing outward, sew in the zipper, connecting the two short sides of the rectangle
3. sew on the circle piece to opening at the top
4. (not pictured) flip the piece so that it’s no longer inside-out

Above is pictured an overview of the order in which I sewed each seam.

Here’s the final result!

Here’s one head with a fuzzy staff cover.

As you can see, the zipper works great and it also nearly invisible in the fur when zipped closed.

And here’s a video of me doing a Steve because, you know, that’s the only trick i know.

In preparation for the festival season last year, I built a swamp cooler! Swamp coolers, also called evaporative coolers, are air conditioners that work without a compressor; they simply cool air by passing it across some water. I think they’re popular for desert camping events because they’re easy to build yourself (no refrigerant or compression) and because they don’t require much power to run (only a fan and a pump in my build).

So evaporative cooling is really fascinating. You’re probably physically familiar with evaporative cooling as it relates to sweat, but, for reference, I will try to restate the model I learned in high school of how it works: when you have water on your skin and air blows across it, some of the highest energy particles in the liquid water collide with air particles at the interface of the water and air, and the air particles impart enough energy that the water particles are freed from the liquid state and enter the vapor state. The net effect for the liquid water is that there are fewer high energy particles in the liquid, and the temperature decreases because temperature is a measure of the average kinetic energy of a collection of particles. As a result, your skin feels cooler. The surprising thing about this process is that the air that passed over the liquid also decreases in temperature. This is because momentum from the air particles was transferred to the escaping water molecules; however, after the water molecules enter the vapor state, they are not as energetic as the air molecules were because some of the kinetic energy was used to oppose the cohesion of the water molecules in the body of liquid. The enthalpy of vaporization is the kinetic energy that was used.

This same effect is used in a swamp cooler, but instead of a pool of water on skin, the water is usually soaked up into a foam pad, and then a fan is used to blow water through the holes in the pad. A swamp cooler may be surprising to someone familiar with a normal air conditioner because, unlike a normal air conditioner, where one side (sticking out the window) heats up and the other side (pointing in to the room) cools down, both the water in the swamp cooler and the air coming out of it get colder. Magical.

Anyway, I followed some of the guides you can find by searching for “5 gallon bucket swamp cooler”. I won’t go through all the build steps here, but here are some links to such guides.

One thing I was confused by was the direction to orient the fan: whether air should get sucked in on the sides and blow out the top, or the reverse. There are guides online that show both ways. The answer is that the evaporative cooling effect works regardless of the direction the air flows, but, for convenience of directing the output into a tent, it’s better to blow out the top.

Materials

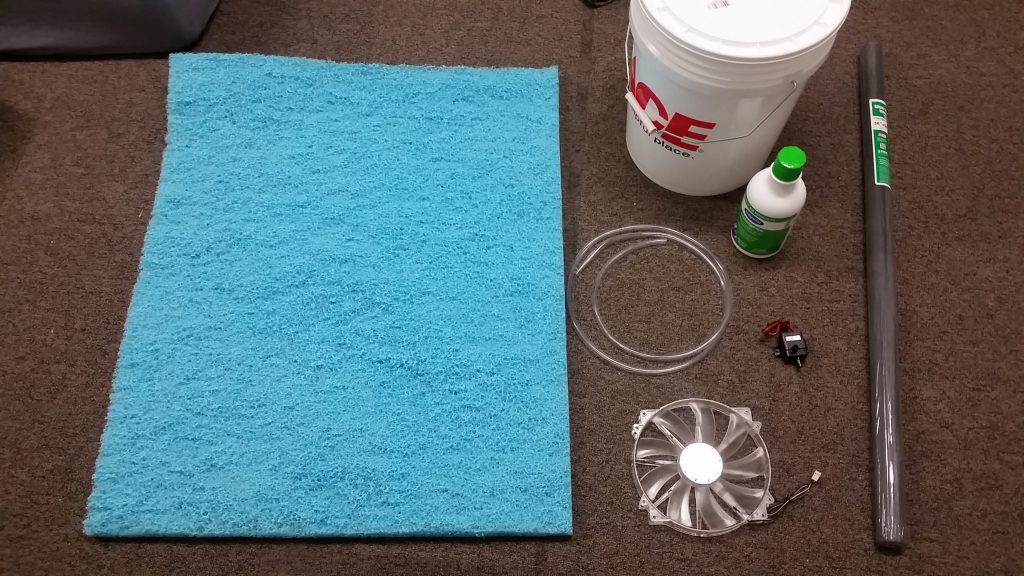
Here are materials I used to build the swamp cooler: evaporative pad, 5 gallon bucket, aquarium tubing, anti-bacterial juice, pump, fan, window mesh.

I found some of these materials a little hard to source in San Francisco, so here are links to each of the ones I used.

  • Duracool evaporative pad: Cole Hardware has these on their website but not in their store, but you can order them and then pick up from the store. One of these is enough for two swamp coolers (or maybe one with doubled-up foam?)
  • 5 gallon bucket and lid: most hardware stores will have these
  • Anti-bacteria juice, from Amazon
  • 12V aquarium pump, 2-pack from Amazon
  • 12V big computer fan, from Amazon
  • Aquarium tubing: obtained from an aquarium supply store
  • Window mesh: most hardware stores will have this

As you can see, a lot of the items I found were in quantities of 2 or more, so if you’re interested in building one, it might be nice to find a friend who’s also interested.

I ran the cooler off a 12V lead acid battery or a 12V power supply. I also picked up some plastic dryer ducting to channel the air that comes out.

Result

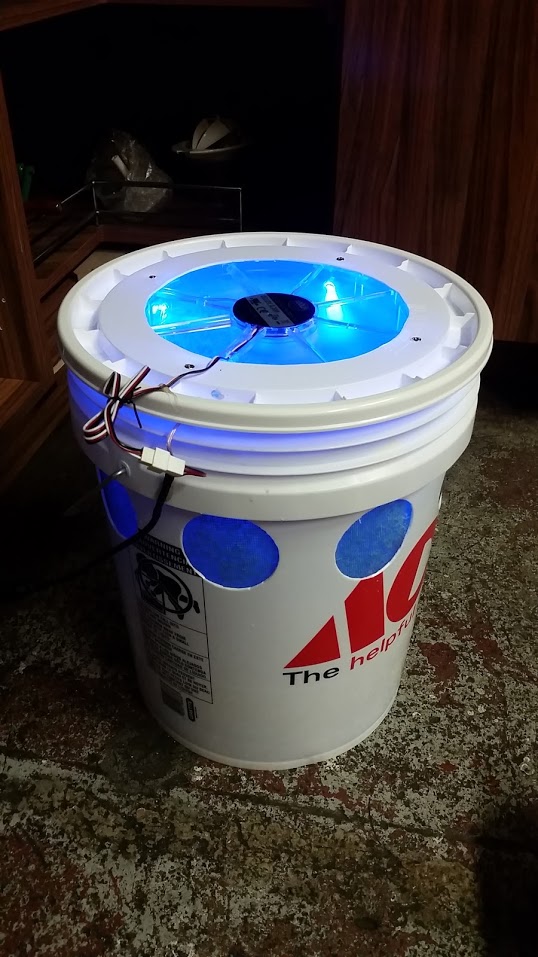
And here’s the final result! I never actually got a chance to use it last year, but I’ll give it a try this summer.

The fan I used was a large computer fan with a blue LED, which I felt imparted an “icy” feeling.

After building this, I’ve also got some ideas for some improvements.

For one, the aquarium pump is really just used to move water from the bottom of the bucket up to the top to drip down the foam pad. I suspect you could put the reservoir above the foam pad and then, maybe with some creativity in a valve for the drip rate, let the water simply drip down the pad.

It would also be nice to have independent switches for the fan and pump: sometimes I just wanted to run the pump, to see if any water was dripping out, sometimes I wanted to run the fan, to dry out the foam before putting it away.

Finally, I think it would be worthwhile to build this device out of some kind of telescoping bucket; right now it takes up a lot of volume, but it’s mostly empty space.

I’ve been playing a lot of Boggle recently, specifically Zynga’s Boggle with Friends (formerly called Wordstreak), and I always experience a little mischevious joy every time I encounter a vulgar or adult word in the game–especially because anatomical words are so often long and high-scoring. This got me thinking “wouldn’t it be great to win a game, but with exclusively dirty words?” This led me to write my “Dirty Boggle Solver”. I implemented it in C++ as a command line utility, which you can get from my github here, and in this post I’ll explain how it works.
Rules of Boggle

First, let me give a brief explanation of Boggle for those who haven’t played before. Boggle is played on a 4×4 grid of randomly picked letters, and the goal is to find words by stringing together adjacent letters in order. Using one letter twice is not allowed.

There are a couple variations in terms of scoring. In the original game, words were score by word length: 3-4 letters worth 1 point, 5 letter words worth 2 points, 6 letter words worth 3 points, etc. In Zynga’s Boggle with Friends, they introduce more scrabble-like scoring in that each letter is wortha specific value, and there are double-letter, triple-letter, double-word, and triple-word tiles, which multiply the score for a letter or for a whole word. There are also additional points for word length.

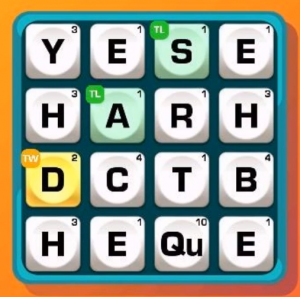
Players must find words in the 4×4 grid in this screenshot of a Boggle with Friends game.

Human Strategy

I first got really into Boggle in the summer of 2010, where I learned a key strategy, which is to find words-inside-of-words. For example, on its own, the word “stared” is pretty good, worth 3 points by the original rules; or in Words with Friends, 7 points for the letters and 6 points for the length, for a total of 13. However, you can earn many more words by noting that “star”, “stare”, “tar”, “tare”, “tared”, and “are” are also contained within the word. It is often easy to find an additional word by tacking on an “s”, a “d”, or an “r”. And that’s not to mention reading the word backward, where you get “rat”, “rats”, and “era”. These are great because you don’t need to spend additional time searching for words (which is the time-consuming part of Boggle).

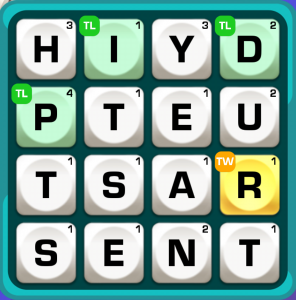
This screenshot from Boggle with Friends includes the word “stared” — worth only 13 points by itself, but worth over 60 points when you also grab all the subwords. (ignoring multiplier tiles for these calculations)

This sub-string strategy has some similarity to the strategy I used in my solver, which I will describe next.

The Solver

As noted by the answer to this quora question, there exist about 12 billion strings on a 4×4 Boggle board. So, one naive solution to make a Boggle solver would be to check every one of those strings against a list of words and return just those that are words. This is exactly how I wrote the first version of my solver, which you can see at commit 0266cfe. In this version, the program opened a list of dirty words, stored them in a hash table, and then it recursively checked every string in a 2D array representing the board.

However, this approach can be improved upon. Consider the example of this board:

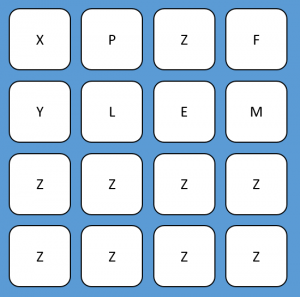
This made-up boggle board contains the word “xylem” as well as lots of paths that are not valid words.

A solver as described would first start with the X tile. It would check if “X” by itself is a word (it isn’t), and then continue. Next, it would append a tile to the string, checking if each of “XP”, “XY”, and “XL” are words. And, for each of these strings, it would continue on, appending letters and checking if the letters make a word, until it has checked every possible string. This approach causes the solver to go down too many paths. “XP” is not a word, but also there are no English words that even begin with “XP”. As a result, the solver wastes a huge amount of time exploring strings that are infeasible based on what they start with.

The optimization I used was to use a prefix tree (or trie) to guide the search. A prefix tree contains strings (or arrays of anything), where words with common prefixes share a common node.

This is a prefix tree for a lexicon consisting of the words “cat”, “car”, “carrot”, and “cold”. As shown in this diagram, each letter is a node in my implementation. The star (*) indicates the end of a word; as shown by “car” and “carrot”, a node may be the end of a word while also having child nodes that lead to a longer word, also marked with a star.

First, I made the program load the list of words into a prefix tree. Then, as the program explores strings, it also checks the prefix tree to see if the current string actually has any descendents in the prefix tree of real words. If not, then the program stops exploring strings beginning with that string.

For example, in the previous example, the program would first check if “X” is a word. “X” is not a word itself; however, there are descendents in the prefix tree, implying that there are words that begin with “X” and thus that it’s worth continuing to search for strings beginning with that tile, so the program continues. However, when the program encounters “XP”, it checks the tree and finds that “P” is not a child of “X”, implying that there are no valid words that begin with “XP”. As a result, the program stops exploring paths that begin with “XP”. It then moves on to the string “XY”, exploring longer and longer strings until it finds the word “XYLEM”, but moving on quickly from paths that won’t produce words.

Result

As you can see in the repo, I made a Python script to measure the performance of the program by timing the search phase. I used the script to run 100 trials of the program at commit 0266cfe (just before adding the prefix tree) and 91b9ce9 (just after). I used the same seed both times, so even though the script generated 100 different boggle grids, the first trial used the same 100 grids as the second trial. In the commit without the prefix tree optimization, the program starts by loading the list of dirty words into a hash table, so it’s constant time to check if a string is a valid word, but the number of strings checked is much higher than with the prefix tree.

On my 2.0GHz CPU with minimal other processes running, the average solve time without the prefix tree was 8290 milliseconds; with the prefix tree, the average solve time was 8.32 milliseconds. That’s about a 1000x speedup!

Trie Implementation

As I was writing this solver, I searched for trie implementations in C++, but I didn’t find any that I liked, so I wrote my own, in trie.h. I wrote a node class, which contains information about its content (a letter), its children, and, regardless of its children, whether that node marks the end of a word. I also wrote a trie class, which contains a root node (and then the root node has child nodes, etc).

My trie class exposes methods like insert (adds a word to the trie) and searchWord (checks if a word is in the trie). However, my boggle solving program actually starts the search from each node, and only checks if there are children for that node, or if that node terminates a word, for which I expose the findChild and wordMarker methods.

I also wrote my classes to be agnostic as to the type of content actually stored — it could be a list of letters, a list of objects, whatever.

Boggle with Friends actually combines “Q” and “U” in one tile, so I made each of my nodes contain a std::string. Most nodes contain a string with only one letter, but some nodes contain the string “QU”. When loading in my list of words, my program discards any words with a single “Q”, so technically I could have just treated “Q” as an implicit “QU”; however, I felt it would be clearer if my prefix tree reflected the actual spelling of each of its word.

Usage

If you’d like to give my program a try, simply download the source from github, run make, and then run the “solver” executable in your terminal. It starts with a command-line interaction for entering the letter grid, which you can do one letter at a time.

Conclusion and Future Improvements

One thing to note about this implementation is that the program loads up a list of words when it starts. In my case, I have compiled a list of dirty, dirty words. But there is no constraint on this list; it turns out this Boggle solver is also a regular old Boggle solver if you just supply it with a full dictionary, such as /etc/whatever/words, or the official Scrabble dictionary. So go nuts!

Overall, I’m quite pleased with the result and enjoyed writing it. I also used this project as an opportunity to work on my C++ chops, so let me know if you have any style suggestions.

Here are some other ideas for future improvements:

  • build the solver into an Android app to run while playing Boggle with Friends
  • figure out letter probabilities in boggle or Zynga’s boggle with friends would give better statistics
  • calculate scoring with the special tiles in Boggle with Friends

Here’s a follow up to my previous post on room lighting with LED strips. I noticed my closet was a little dingey and I still had another two meters of LED strip leftover from my previous order, so I installed them inside my closet. My closet at the time had 3 doors, so I added some limit switches to detect when each door was opened, and I connected the limit switches and LED strip to an Arduino and a power supply.

In retrospect, I bet I could generate the timing signal for the LED strip with just some 7400 series ICs, and it might be fun, but I wanted to provide for animation in the future — say, fade-in and fade-out, or illuminating just certain sections of the closet at a time.

Anyway, I threw on some code with the Bounce2 and Adafruit NeoPixel libraries and got it running. Here’s a video of the lights turning on and off as I open and close the doors.


This post describes the making of some Hot Ice Cream: scoops of hot (but solid) ice cream that melts as it cools. I made this dish a few years ago and didn’t write it up, but I was talking about it with someone recently, which prompted me to upload a few photos.

The shredded chocolate started melting because, of course, it’s hot.

I was inspired by this post, this post, this post, and others. All these recipes use methylcellulose (of which I happened to have a lot). Methylcellulose forms a solution in cold water and sets at the water is heated; as the water cools, the gel un-sets, appearing to melt. My understanding is that methylcellulose is popular in cooking for making consomme (clarified broth); previously, this was done with egg whites. ChefSteps has a good description of this:

When you whisk a foam of methylcellulose into the stock and heat it up, it will solidify and rise to the surface, pulling up oils and other small particles with it, and leaving a clear consommé behind. Those tiny droplets of oils and small particles are what make a stock cloudy by scattering light. When you remove them, you have a crystal-clear, golden consommé. The actual advantage of using methylcellulose over egg whites is that egg white proteins carry an electrostatic charge that tends to “gather up” aroma molecules, removing them from the stock and making for a less flavorful consommé. Methylcellulose, then, yields a clarified stock with a deeper and more aromatic flavor profile.

So basically, it’s not actually eaten, it’s just used as a filter and then thrown away. However, as indicated in the above recipes, it is edible (tecnically, more on taste later) and is also used for its unusual temperature-dependent qualities.

One tricky step I encountered is actually mixing the methylcellulose into cold water. The powder clumps, like mixing flour in cold water, but even worse. Wikipedia describes the mechanism at work here as well as the workaround that I used:

As the powder comes into contact with water, a gel layer forms around it, dramatically slowing the diffusion of water into the powder, hence the inside remains dry. A better way is to first mix the powder with hot water, so that the methyl cellulose particles are well dispersed (and so have a much higher effective surface area) in the water, and cool down this dispersion while stirring, leading to the much more rapid dissolution of those particles.

Curiously, this workaround (dispersing the powder in hot water first) leads to an interesting sequence of states of the mixture. First, the mixture is hot but runny because the powder is dispersed throughout but not set. Then, the mixture cools and solvates the methylcellulose, so it is cold and runny. Finally, only when the mixture is heated the second time does it becomes thick.

Anyway, I roughly followed the above recipes to make two batches. In my first batch, I used no mascarpone and upped the amount of methylcellulose (like in the third link) whereas, in my second batch, I used mascarpone as well as earl grey tea to make a tea-flavored hot ice cream. Here are some pictures of the results!

I set the substance by resting some of it in an ice cream scoop in boiling water.

I used some of the first batch to make a Reverse Affogato: scoops of hot, vanilla ice cream with iced coffee poured over. As the coffee cools the hot ice cream, it melts.

I spiked the ice coffee with some Kahlua :P

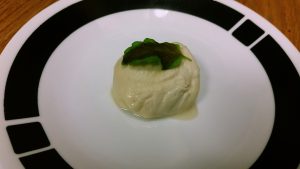
This hot ice cream was pretty fun to play around with. Even though the temperature was different, it really looked just like the real thing! Here, I plated a scoop and topped it with a mint leaf. Without thinking, I popped back to my room to grab a camera, but, by the time I had returned, the leaf had become wilted and brown!

I was more careful when I took the next photo of a scoop!

The second batch, which I flavored with earl grey tea, tasted better but didn’t solidify so well. It seems like it takes a lot of methylcellulose to get that to happen, and the mascarpone wasn’t helping much.

Here, I’m blending mascarpone together with sugar in preparation for my earl grey tea batch.

Ultimately it looked cool, but the texture and taste were really weird. It moved like stiff pudding. Eating it was was like eating sweetened plastic. The methylcellulose coated your tongue and didn’t wash off. The mascarpone version didn’t really taste like ice cream; it tasted like mascarpone. Maybe I’ll try this again with a different type of methylcellulose or less of it. Also, the texture of ice cream arrises from its tiny, crunchy water crystals. Maybe mixing in some salt crystals or course sugar crystals would mimic this.